Indoor Cycling (IC), or in its popular name ‘spinning,’ is undertaken by people of all ages, fitness levels, and body mass indices (BMI). Spinning addresses cardio fitness, blood pressure, stress, sleep, mood swings, and weight issues. Your Peloton is a premium fitness bike; make sure your handlebars, seat, and pedals are set up correctly to fit your specific physical needs and requirements.
To adjust the handlebars properly, first, open the lever at the base of the handlebars. Next, stand in front of the seat, put the forearms under the handlebars, and lift to the max height. Sit on the bike. If adjusted correctly, the forearms should rest on the handlebars with the back at 45 degrees.
Once you have completed this initial handlebar setup, you should take your Peloton for a few test spins and check how comfortable you feel using the handlebars. In the following discussion, I will guide you through the necessary adjustments required to complete setting up your Peloton’s handlebars.
How High Should My Peloton Bike’s Handlebars Be?

The first rule of thumb is that you are not supposed to sit upright on your Peloton bike. Your handlebars should therefore not be set too high. When you lean forward as you ride, you exercise the muscles at the front of your thighs, calves, shoulders, core, and the muscles in the back.
Your handlebars, which we suggested you put in the topmost position, may have to be lowered until your back reaches a 45 degrees angle. Later, we will see how the handlebar, seat, and pedals need to balance. Having any of these incorrectly set may cause pain in your back, shoulders, hips, knees, and wrists.
How To Adjust The Peloton Bike’s Handlebars For My Fit?
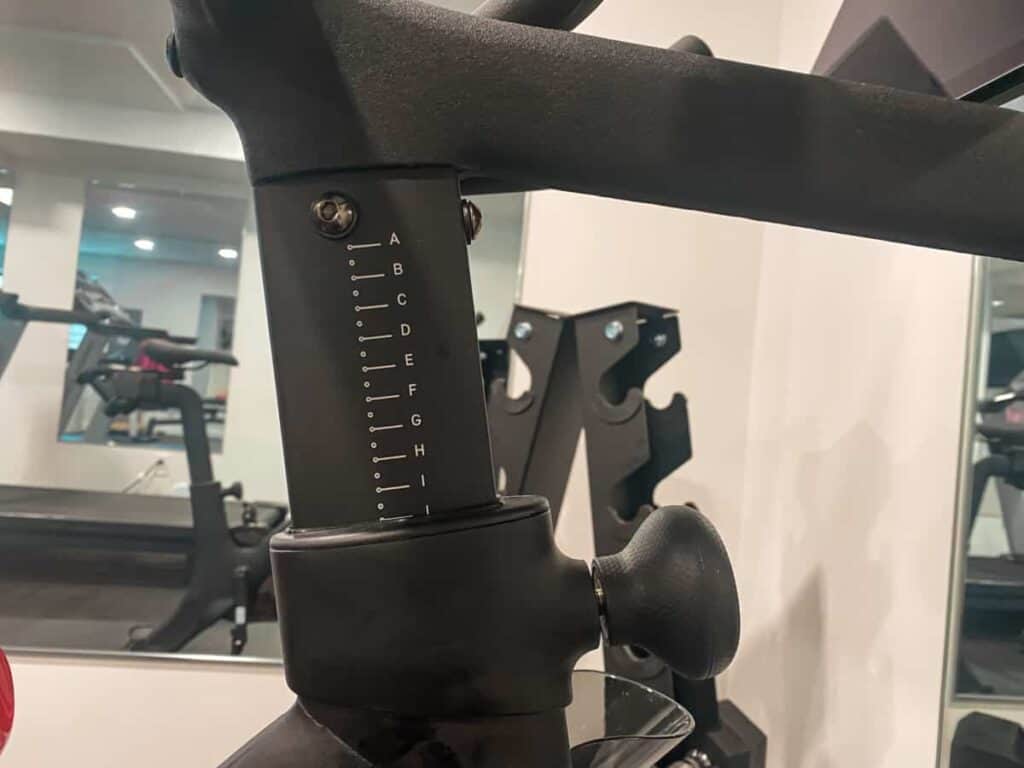
Here is how to adjust the handlebars. Remember that you should reassess the position of the handlebars, seat, and pedals occasionally, especially if you experience pain or excessive discomfort. Release the handlebar’s L-Handle. Straddle the bike and pull the handlebar toward you. You may also stand at the bike’s front and push the handlebars towards the seat.
You can change the handlebar’s position by carefully checking the A-to-MAX markings on the handlebar’s post sleeve and adjusting the handlebar according to your needs. Generally, your seat should be on the same level, or higher, than the handlebars. This ensures you are not sitting upright on the bike but leaning forward.
What Are The Peloton’s Three Contact Points?

As you spin on your Peloton Bike, you use a combination of the unit’s seat, pedals, and handlebars to exercise various body parts. These are the three contact points between the cyclist and the bike. For a spin-ride to be beneficial and comfortable, the distance between the contact point must be correctly assessed and set.
The contact points’ distance from each other is based on the cyclist’s length of leg and torso and whether they wish to lean forward or sit upright. The pedals, seat, and handlebars must also be used correctly, including the foot placement in the pedal, the angle, horizontal position and height of the seat, and the handlebars’ height and reach.
How To Adjust The Peloton’s Three Contact Points?
Since no two cyclists have identical body dimensions, adjusting the pedals, seat and handlebars must rely on trial, correction, then trying again. Here are three hacks to help you adjust the Peloton bike’s three contact points. You can make further adjustments once you’ve experienced a few spin classes.
Adjusting Contact Point 1: The Peloton Seat

The process starts with the seat because it holds the biker’s entire body weight by supporting the sit bones at the pelvis’s bottom. When the seat works as it should, the biker can cycle without pressure on men’s perineal area and women’s pubic bone arch.

Setting up the Peloton seat involves two basic adjustments – height and horizontal position. Height is set firstly by standing next to the bike and adjusting the seat’s height to level with your hip bone. The seat’s horizontal position is initially set by putting your hand across the bike. The seat should be a forearm’s distance from the handlebars.
Adjusting Contact Point 2: The Handlebars

We discussed the handlebars earlier. The most important takeaways are that the handlebars’ height should enable you to spin with your upper body leaning forward at about 45 degrees. Set a forearm’s distance between the seat and handlebars. Leaning forward, you should be able to rest your forearms on the handlebars comfortably.
Adjusting Contact Point 3: The Pedals
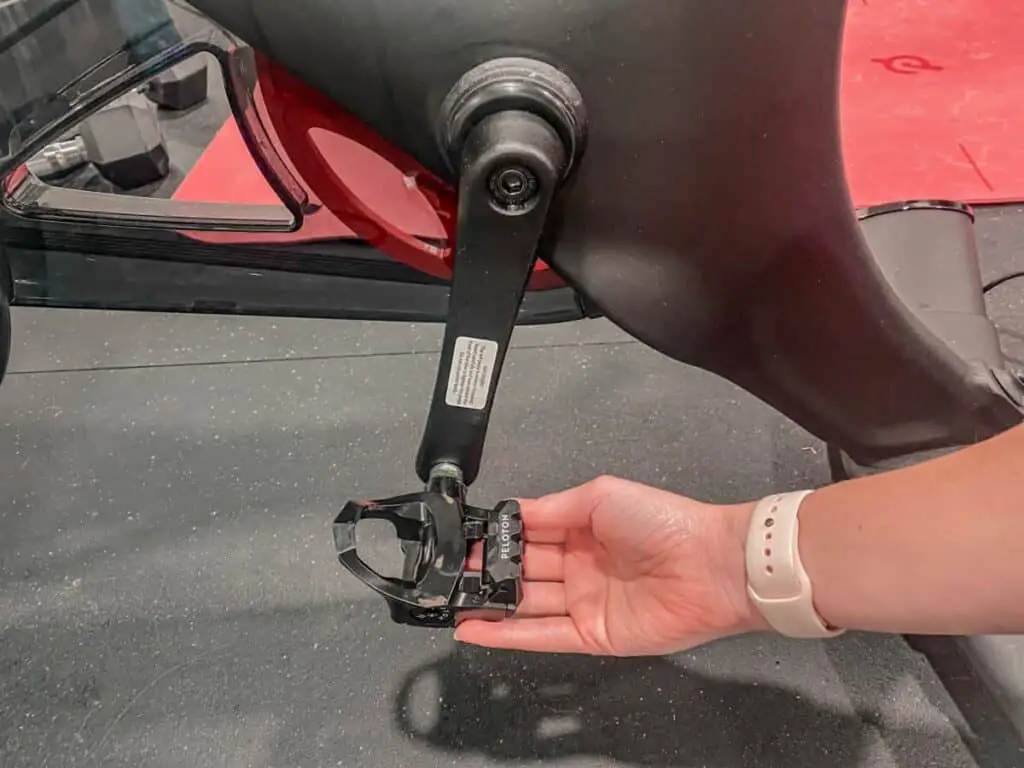
As a part of the three contact points, your Peloton pedals affect your biking experience according to their type, size, and action. There are various pedals for spinning bikes, and each type handles the biker’s shoe differently. Some fasten it tight, others hold the toe, and some pedals, known as ‘flats,’ resemble the pedals on our childhood bicycles.
Pedals serve as holders for the biker’s feet as they push the crank that moves the wheels in regular bikes and generate pre-planned, measurable resistance that enables them to invest energy for exercising purposes. The connection between the pedals’ resistance and their distance from the seat and handlebars affects the spinning session’s intensity.
As discussed earlier, initially, you position your seat by standing next to the bike and changing the seat’s height so it is level with your hip bone. You also make sure there is a forearm’s distance between the seat and the handlebars. To ensure you use the pedals correctly, you need to make two additional seat adjustments.
While sitting on your bike and making sure your hips are perfectly balanced across the bike, move the pedals so your foot is in the lowest position (if the pedals are the hands of the clock, the lower pedal should be at the 6 o’clock position.) Your knee should be slightly bent. If it is straight – the seat is probably too high. If it is sharply bent – the seat is too low.
Secondly, position the pedal at the 3 o’clock position. The knee should be positioned precisely above the ankle. If the pedal is positioned behind the ankle, the seat is set too much to the back. If the knee is bent sharply forward, the seat is too much to the front.
Conclusion
We have looked at ways to set and adjust your Peloton bike’s handlebars to ensure your spinning experience is painless. In addition, we looked at how the three contact points of your bike: handlebars, seat, and pedals, interact with each other so that adjusting the one contact point necessitates an adjustment to the other two.