The bearings on the Peloton bikes are under a lot of stress and are the part of the bike that is constantly being utilized every second you are cycling. Due to this constant strain and torture that is being exerted on it, the bearings will eventually fail. But when?
A Peloton bearing can last multiple years if kept in the right condition. Peloton bikes ship with a 12-month warranty, so at the least, they should last you a year, with the intended use being a daily ride. However, some users have noted that the bearings are faulty and have failed with minimal use.
Learn how long the bearing on a Peloton will last and if there are any problems associated with it. Also discover how to know when it is faulty, how much it will cost to replace and install, and how to do it yourself.
How long do peloton bearings last?

Peloton Bike bearings will usually last 12-24 months if you ride an average of 15 miles per day. If you use your Bike less often, you can expect them to last much longer. In some cases users are getting less than 3 months on their bearings. Our bike has thousands of miles and have not had an issue.
Depending on how vigorously you use the bike and how hard you drive it, the bearings can last anywhere from a couple of months to many years. However, it will take an extreme feat to wear out the bearing in a couple of months, if not impossible (unless the bearings are faulty for some reason).
Peloton has manufactured the bearing with professional cyclists in mind; hence, the bearing is able to handle at least a one-hour cycle daily.
It should be noted that many individuals who have purchased a brand new bike have had issues with the bearings where they fail pretty quickly. In particular, one Reddit user noted that their bearing failed after only 25 hours of use.
However, the amount of individuals who report a defect in their bearing is minimal. Peloton has approximately 5.9 million members on their platform, and if we assume that only 1% of the members on the platform have a Peloton bike, that means 59000 individuals, for the most part, have not had any problems with the bearing.
How to tell if your Peloton bearing is faulty?
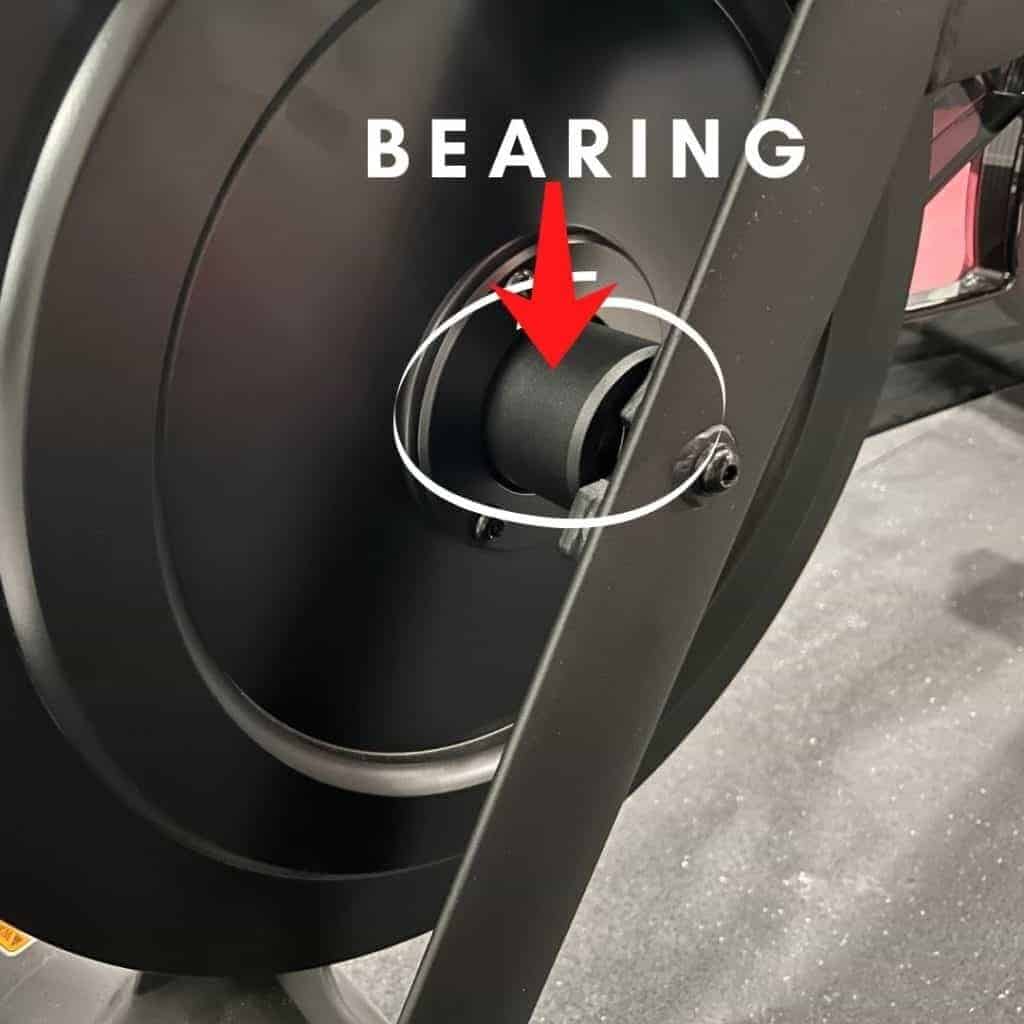
If you are able to hear a rubbing or grinding noise when you are cycling, then it is most definitely a bad bearing. Take note that the Peloton bearing is not the typical bearing (ball bearing) that you may recall.
The bearing or hub assembly is located in the middle of the Peloton flywheel. This metal wheel and the bearing rotates and spins when you cycle and push on the pedals.
How much does it cost to replace Peloton bearings?
If the warranty still covers your Peloton bike, then you have no need to worry. All you will have to do is log the problem with Peloton, and they will either send someone to replace it or send you a new bearing that you can replace on your own. Depending on where you are located, these options may be available or not.
If the warranty no longer covers your bike, you can either purchase the bearing solely or purchase it and get a technician to install it for you. A technician will cost you approximately $100, while parts will range in price from $30 upward.
How to maintain your Peloton bike, so the bearings last longer
In order to prolong the life of your Peloton bike and the bearing, there are a couple of steps that you can take which are simple enough to do and won’t take you much time at all. However, it is essential that these cleaning and maintenance steps are taken every time you use the bike and when necessary.
Wipe down the Peloton Bike and Flywheel After Use
It will help if you remember that you will probably sweat and sweat a lot when you use the bike and exercise. Sweat is mostly made up of water, and water erodes metal and rusts it if left uncleaned and untreated.
Take note that the flywheel and bearing are made out of metal, and water over a prolonged period of time can result in corrosion, which is something that you do not want sitting on the bearings.
The problem is not only with water but with dust and dirt. Once again, these particles can get into the inner workings of your bike and bearing, causing havoc if left unchecked and treated. Besides wiping your bike down because of sweat after use, make sure to wipe it down for dust if you have not used it in a while.
These cloths work wonders at removing sweat and debris off of the Peloton bike, we suggest keeping a little basket near the Peloton bike with a handful of these cloths so they are readily available after each ride!
Use only gentle cleaning products for wipe downs
It would be in your best interest if you only use products that don’t contain any harmful chemicals if you intend to use them in conjunction with wiping down your bike, flywheel, or bearing.
Cleaners that contain certain chemicals can erode or even rust specific materials, and you may not know this until it is too late. Your peloton bike is made up of various materials like metal, plastic, and PVC.
These materials and parts are situated all over the bike and rather than getting different cleaners for the various parts, look at getting a non-abrasive cleaner with no chemicals.
Check out this cleaner on Amazon here
Lastly, instead of spraying the cleaner directly onto the bike or bearing, make sure that you spray it into a cloth first and then wipe it afterward. This will ensure that no excess liquid will get anywhere it is not supposed to.
How to fix or replace a Peloton bearing
If you find that your Peloton bearing is faulty and you intend to replace it yourself, the process to do so is not that labor-intensive; however, it will require a couple of tools, some time, and patience.
The tools you will need are;
- Screwdriver
- 5mm Allen key
- 4mm Allen key
- Torque wrench
- 5mm bit
- 19mm socket
A step-by-step guide to replacing the Peloton bearing
The first thing you will need to do is gather your tools, the new bearing, and then power down and unplug the bike. Then;
- Remove the screw from the top of the front belt guard and plastic rivet at the bottom
- Using the 4mm Allen wrench remove the cadence sensor bolt
- Using the screwdriver and a Phillips’s head, remove the five screws from the outer belt guard
- Slowly rotate the crank arm while pulling the belt towards you
- Using a 5mm Allen wrench, remove the axle bolts from both sides of the flywheel
- Remove the flywheel and place it on a soft surface with the hub facing up
- Use the 5mm Allen wrench to remove the hub bolts
- Slide the hub assembly out from the drive hub; if it is two pieces, pull them apart
- With your new hub assembly, if it is a two-piece, push the threaded end of the axle into the flat side of the drive hub
- Using a wrench with a 19mm socket, screw the axle nut onto the axle
- Then add the second half of the hub assembly to the flywheel and add the new drive hub to the flywheel
- Add the three bolts and tighten with the Allen key
- If you are using a one-piece hub assembly, insert the hub from the flat side of the flywheel with the idler hub pointing inward
- Insert the three bolts and tighten with the Allen key
- Then tighten the bolts with a torque wrench till there is 10 lb-ft of torque
- Reverse the instructions and replace everything back together
Conclusion
In general, your Peloton bearing will last you approximately one year at a minimum, even if you intend to use the bike consistently and intensely each day. The Peloton bike comes with a 12-month limited warranty, so if you do have any problems within those 12 months you will be able to replace the bearing without a fuss.
If your warranty has expired, it will cost approximately $50 to $100 dollars to install a new bearing yourself or to get a technician to do it.
Remember to keep your bike clean (using non-abrasive cleaners) and to maintain it as often as possible to keep it in the best condition and to prolong its life expectancy.


